
TL;DR
Effective sound control in a closet rig hinges on smart placement, targeted acoustic treatment at reflection points, and proper ventilation. Moving your rig into another room often beats expensive foam or isolation measures. A well-ventilated closet setup can produce surprisingly good sound, if you treat it right.
Ever wonder why some closet setups sound surprisingly good while others turn into echo chambers? It’s all about where you put your sound treatment, how you position your gear, and how you manage heat and noise leaks. The truth is, the biggest wins come from thinking about placement first — not stuffing the space with foam.
This guide walks you through practical, no-nonsense steps to turn your closet into a quiet, professional-sounding corner for voice work, podcasting, or even AI inference rigs. You’ll learn why moving your rig into a different room often beats fancy gadgets, and how to keep it cool while doing so.
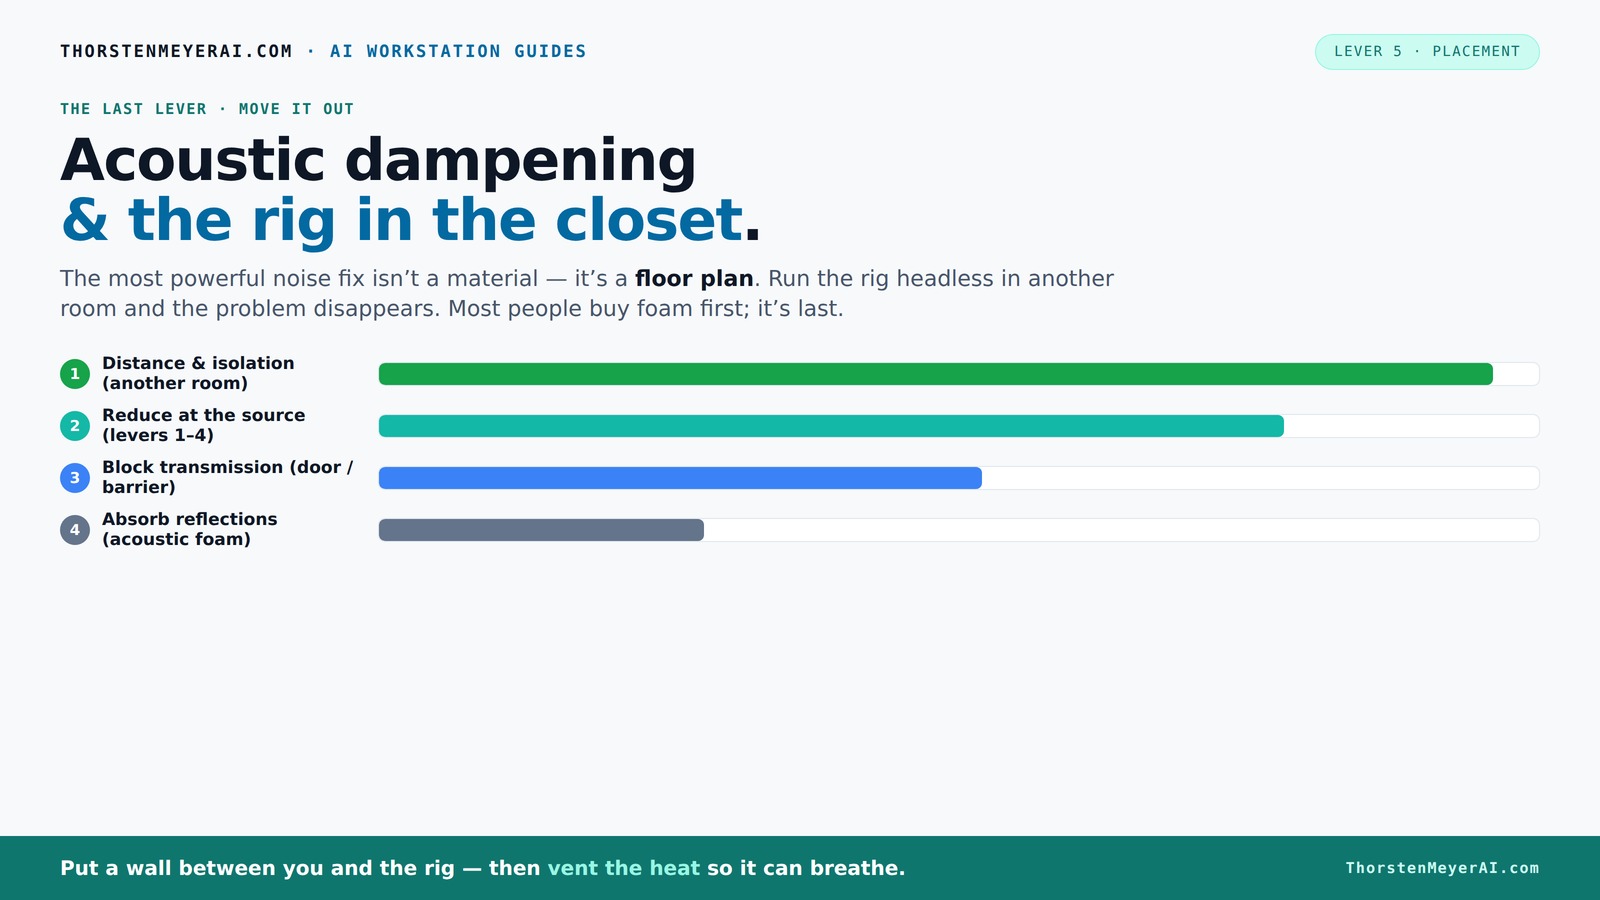
Acoustic dampening
& the rig in the closet.
The most powerful noise fix isn’t a material — it’s a floor plan. A rig you can’t hear because it’s in another room beats any amount of foam. Tap the approaches in Part 1 to see what actually works.
(another room)
(levers 1–4)
(door / barrier)
(acoustic foam)
Contain the noise, not the heat
Key Takeaways
- Prioritize placement of absorbers at first reflection points and near the source for maximum impact. You can learn more about sound treatment strategies.
- Moving your rig into another room often beats expensive soundproofing efforts — distance is your best friend.
- Ventilate your closet setup properly to prevent heat buildup and thermal throttling.
- Sealing gaps around doors and vents is crucial for reducing sound leaks.
- Start with simple, targeted treatments — like blankets and foam at reflection points — before overbuilding.

Focusound 52 Pack Acoustic Foam Panels 1" x 12" x 12" Sound Proof Foam Panles Soundproofing Noise Cancelling Wedge Panels for Home Office Recoding Studio with 300PCS Double-Side Adhesive
Soundproofing - Acoustic foam panels triangular grooves structure for better noise absorption, helps to reduce and absorb unwanted...
As an affiliate, we earn on qualifying purchases.
As an affiliate, we earn on qualifying purchases.
Why Placement and Reflection Points Matter More Than You Think
Acoustic dampening isn’t just about slapping foam on the walls. It’s about controlling how sound bounces around and how close it gets to your ears. Placing absorbers at the first points where sound hits the walls — like behind your microphone or near speakers — cuts down on harsh echoes and muddiness.
Think of it this way: sound reflections are like echoes in a canyon. If you can strategically place absorptive materials at the points where sound first bounces, you effectively prevent those reflections from bouncing back into your microphone or ears, leading to clearer recordings and less muddiness. The tradeoff is that improper placement can cause uneven absorption, which might make some areas sound dead while others remain reflective. It’s about finding the right spots to treat, which often requires some experimentation and understanding of your specific space.
Controlling reflections directly impacts the intelligibility and warmth of your recordings. For detailed tips, see self-improvement and acoustic tips. When reflections are minimized, your voice sounds more natural and professional, reducing the need for excessive post-processing. The implication is that effective placement can often replace or reduce the need for expensive acoustic panels, saving money and space while still achieving high-quality sound.

Portable Recording Booth for Home Studio, Foldable Sound Isolation Vocal Shield with Floor Stand, High-Density Acoustic Blanket Enclosure for Singing, Voiceover & Podcast, Includes Phone Holder
INSTANT STUDIO-QUALITY "DRY" SOUND: Transform any noisy room into a professional vocal booth instantly. Engineered with high-density acoustic...
As an affiliate, we earn on qualifying purchases.
As an affiliate, we earn on qualifying purchases.
How to Find the Perfect Reflection Points in Your Closet
- Stand in your usual recording position, facing your closet wall or door.
- Hold a small mirror flat against the wall or door, then move it around until you see your microphone or speaker reflected in it.
- This spot is your first reflection point — place a panel or blanket there.
This simple trick turns a dull wall into a targeted sound absorber, knocking down reflections right where they matter most. It’s cheap, quick, and incredibly effective. Understanding and treating these points makes a significant difference because they are the locations where sound naturally ricochets toward your ears or microphone. Ignoring them means you’re leaving echoes and reflections that muddy your sound. The tradeoff here is that if you don’t accurately identify these points, you risk missing the most impactful spots, leading to less effective treatment and ongoing echo issues. Properly addressing reflection points ensures your space sounds clearer, more natural, and reduces the need for heavy EQ or post-processing.

TroyStudio Portable Vocal Booth, Large Foldable Microphone Isolation Shield, Music Recording Studio Sound Echo Absorbing Box, Desk & Stand Use Reflection Filter with Thickened Dense Acoustic Foam
【BASIC INFO】: Inside size after setup: 8'' (L) X 10'' (W) X 12'' (H), large space for various...
As an affiliate, we earn on qualifying purchases.
As an affiliate, we earn on qualifying purchases.
The “Rig in the Closet”: How to Keep It Cool Without Turning It Into an Oven
Putting your noisy, heat-generating rig in a closet sounds perfect — until it turns into a sauna. The biggest challenge isn’t just noise; it’s heat. GPUs and CPUs dump hundreds of watts, and sealed spaces trap that heat, causing thermal throttling and loud fans. Overheating can compromise your hardware’s longevity and performance, and noisy fans defeat the purpose of a quiet setup.
The fix? Ventilation. You need a way for hot air to escape and cool air to enter. For more on managing your space effectively, visit lifestyle and space management. Passive vents are cheap but less effective because they rely on natural convection, which can be slow and insufficient. Active exhaust fans with temperature sensors can dynamically regulate airflow, maintaining a safe temperature while minimizing noise. The tradeoff is that poorly designed ventilation can introduce noise leaks or sound disturbances. For serious silence and cooling, consider a purpose-built soundproof cabinet with ducted airflow and acoustic lining. These units balance soundproofing with heat dissipation, keeping your system safe and quiet. Proper ventilation ensures your rig stays cool and reliable without sacrificing the acoustic environment you’re aiming for.

Primacoustic London 10 - Black
Acoustic Room Treatment Kit with Eight Control Columns
As an affiliate, we earn on qualifying purchases.
As an affiliate, we earn on qualifying purchases.
Soundproofing vs. Dampening: Why Your Closet Needs Both
Soundproofing and acoustic dampening aren’t the same. Learn more about soundproofing techniques. Soundproofing is about blocking sound from leaking out, which requires dense, mass-loaded barriers and airtight seals. Dampening reduces echo and internal reflections, making the sound within the space clearer and more controlled. In a closet, you want to seal gaps around the door with weatherstripping, add mass with dense drywall or panels, and block leaks from vents. Meanwhile, inside, soft materials like blankets, clothing, or foam panels absorb reflections and improve clarity.
The tradeoff is that achieving both requires balancing between sealing and absorption. Over-sealing can make the space feel claustrophobic and hinder ventilation, while excessive damping might deaden the sound too much, making recordings sound unnatural. Understanding the distinction helps you prioritize your efforts: seal leaks to prevent noise leaks, and add absorption to improve internal acoustics. The implication is that a combined approach yields the best results, with proper attention to both aspects based on your specific needs and space constraints.
Frequently Asked Questions
What's the biggest mistake people make when treating a closet for sound?
Many focus solely on adding foam or panels without addressing sound leaks or heat buildup. For comprehensive advice, check out self-improvement resources. Sealing gaps and ensuring proper ventilation are often overlooked but are critical for real improvement.Do I need expensive acoustic panels, or will blankets work?
Blankets, rugs, and clothing can significantly reduce reflections in small spaces. For more serious control, targeted foam panels at reflection points make a noticeable difference. Start simple and upgrade as needed.Can I treat a closet myself, or do I need professional help?
You can definitely treat a closet yourself with basic materials like blankets, weatherstripping, and foam panels. Focus on sealing gaps, placing absorption at reflection points, and ventilating properly for best results.How do I keep my rig cool in a sealed closet?
Install a small exhaust fan with a thermostat or passive vents to allow hot air to escape. Using ducted airflow or a purpose-built soundproof cabinet can also help manage heat without sacrificing silence.Conclusion
Effective sound control in a closet rig isn’t about filling every inch with foam. It’s about smart placement, sealing leaks, and managing heat. Moving your setup into another room often makes all the difference — it’s the simplest, most effective fix.
Picture a quiet corner in your home, where your voice sounds clear and warm. That’s what a well-placed, well-ventilated closet can become. The real secret is thinking strategically, not just adding treatment for the sake of it.